Become a professional master in Microsoft Outlook by learning these useful tips and tricks to help you management your emails better and work more productivity.
Table of Content
1. Create Calendar Events and Reminders with Drag-and-Drop
Drag-and-drop an email message (by clicking and holding down the left mouse button) to the calendar icon to create an event or reminder. Outlook will automatically include the important information in your email message into your calendar item. You will have the information in your calendar event without you needing to search for the original email.
![]()
Alternative to a left drag-and-drop, do a right drag-and-drop to the calendar icon gives you additional options for creating your calendar event, as illustrated below.
![]()
2. Use AutoCorrect to Automatically Insert Frequent Phrases
The AutoCorrect feature can be used to automatically insert frequently used text or sentences with a simple short keystroke combination. Long disclaimer statements, reference terms, and any other long series of text can easily be inserted by typing in just a few letters.
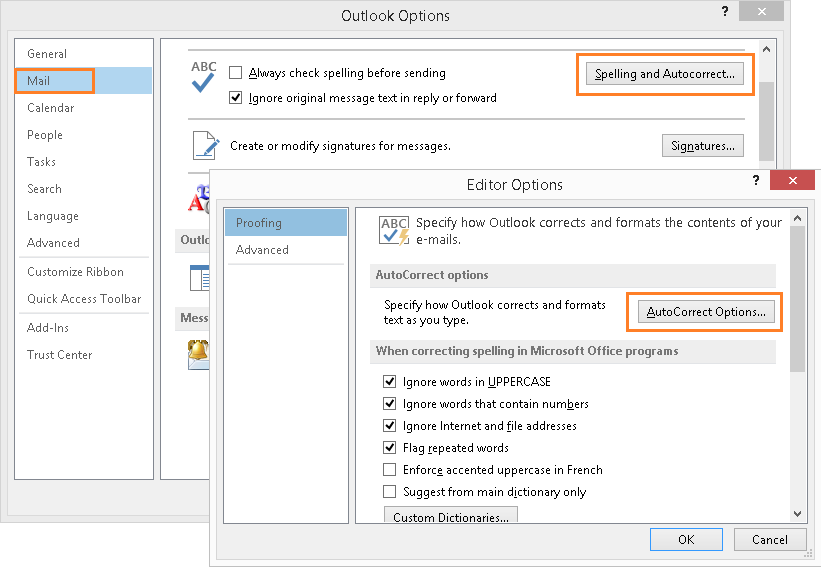
- In Microsoft Outlook, click on File > Option > Mail.
- In the Outlook Options dialog box, click on the Spelling and AutoCorrect button.
- In the Editor Options dialog box, click on AutoCorrect Options button.
- In the AutoCorrect dialog box, type in a short key stroke combination you want to use and type in the sentence(s) you want Outlook to automatically replace it with. In the example below, we use the key strokes
^Fto have Outlook insert the sentenceI have a new phone number. Please update your address book accordingly.
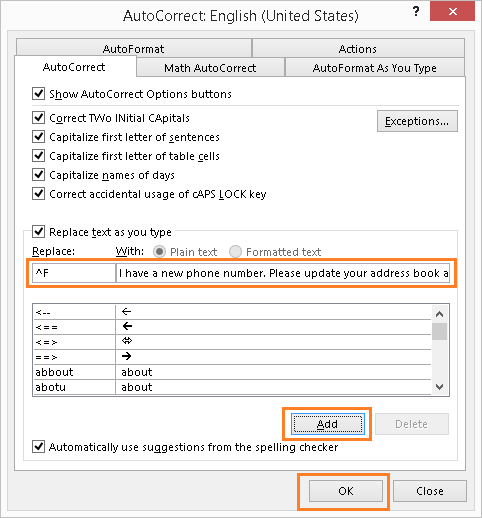
- Click Add and the OK button.
Now, as you compose new email messages, when you type ^F and press Space Bar, Outlook will automatically replace it with I have a new phone number. Please update your address book accordingly.
This is a quick and easy shortcut to type in repetitive text into your messages.
Back to Top3. Use Voting Buttons to Poll Interest and Feedback
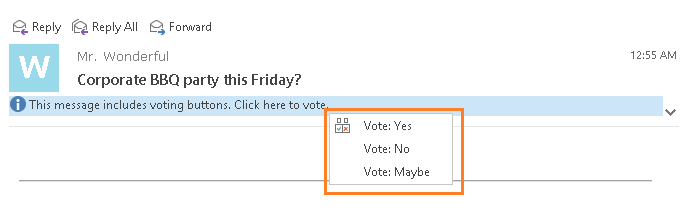
Use Outlook to poll people's interest and feedback using voting buttons. Each recipient who receives your email then simply clicks on a link to cast their vote. As the sender, you can see the tally of the responses. Please note this feature is only available to recipients using a Microsoft Exchange email server. Recipient that are not using Exchange will still receive your email but will not have the ability to cast their vote using voting buttons.
To create a poll, follow these steps:
- Compose a new email message.
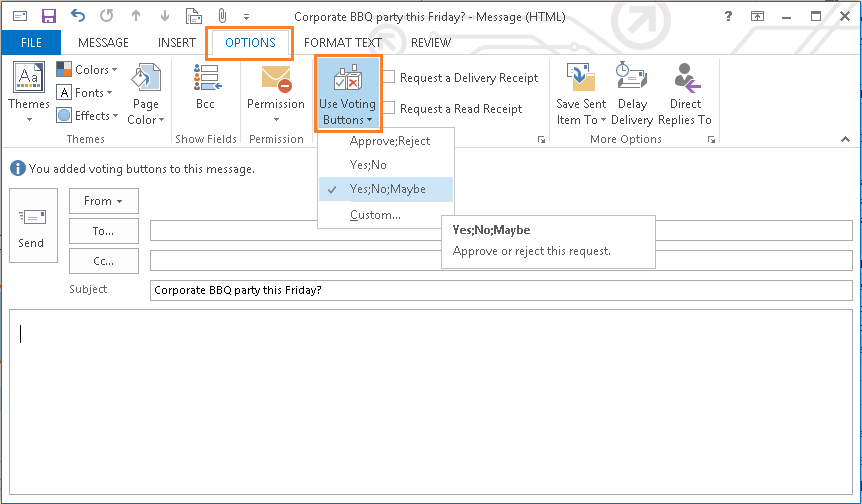
- Click on the Options tab.
- Click on the Use Voting Buttons icon.
- Select the type of vote options you want to create. Alternatively, you can create custom voting buttons by selecting Custom from the drop-down list.
- When your recipients receive your email, they will be able to vote on your poll.
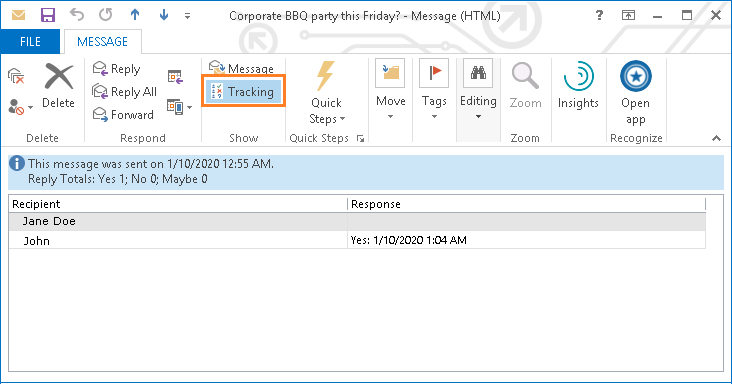
- As the sender of the poll, you will receive an email for each vote received. Alternatively, you can view a tally of the responses. Do this by opening your original email in your Sent Items folder and click on Tracking. You will see a summary of the responses received thus far, as illustrated below.
4. Blind Carbon Copy (BCC)
Similar to the Carbon Copy (CC) field, the BCC message field allows you to include multiple recipients of your email. However, email addresses listed in BCC will not be visible to others. In other words, recipients listed in BCC will not see the others email addresses listed here. From their perspective, it will appear the email message was addressed specifically to just that person. This feature is great to use if you are emailing to a list of people (such as your customers) but you need to protect the privacy of the names and email addresses by not exposing them to everyone else on the list.
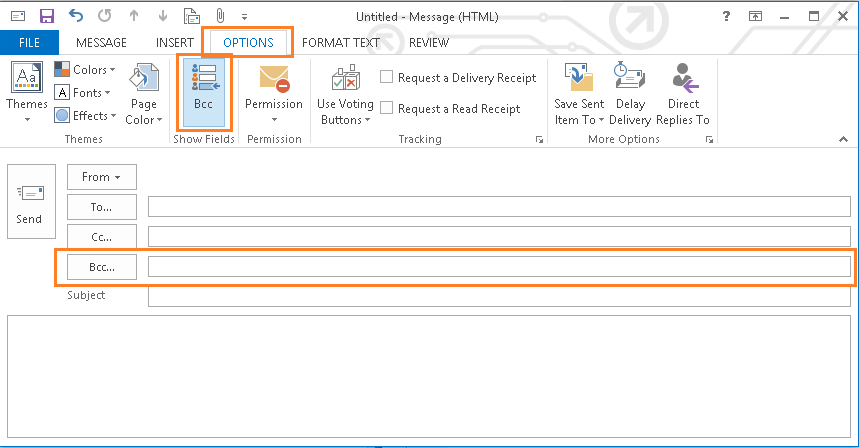
The BCC field is not visible by default. To enable it, follow these steps;
- In Outlook, open a new message window.
- Click on Options tab then the Bcc button.
- The Bcc field will now appear, as illustrated below, and you can then type your email addresses. When entering multiple email addresses, remember to separate each with a semicolon.
5. Change Reply-To Address
You can change the reply-to address in the emails you send so that others can receive and handle replies instead. This is useful if you composing and sending emails from your account on behalf of someone else (such as if you are an executive assistant), but need to have replies be directed to the other person. Or, perhaps you will be on vacation but need to make sure a colleague can respond back to your customers. To change the reply-to address, follow these steps:
- Open a new message window in Outlook.
- Click on Options > Direct Replies To.
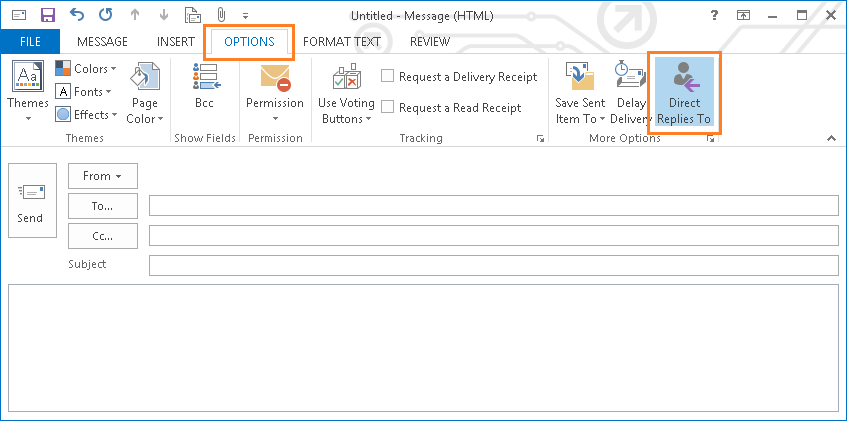
- In the Properties dialog box, look for the option "Have replies sent to" and enter the email address of the person that is to receive the replies. When your recipients reply to your message, it will be sent to the email address you specified here.

6. Signatures
This feature enables you to have Outlook automatically add a pre-defined text to the end of your email messages. Typically, the signature will include your name, company name, job title and contact information. This feature minimizes the repetitive typing of common text you want or need to include in every email you send. With Outlook signatures, you can include hyperlinks, images (such as your company logo), and even incorporate your company colors in your text to match your company's branding if necessary.
If you manage multiple email accounts, you can create a specific signature for each. To create a signature, follow the steps below.
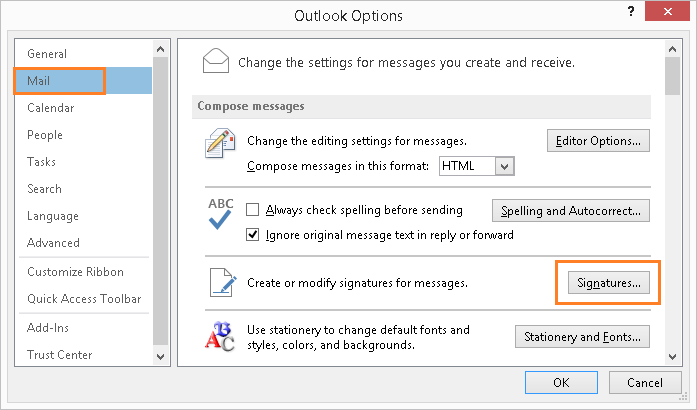
- In Outlook, click on File > Options to open the Outlook Options dialog box.
- Click Mail from the left sidebar, then click on the Signatures button.
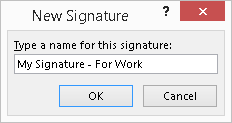
- In the Signature dialog box that appears, click on the New button, give your signature a name, then click OK.
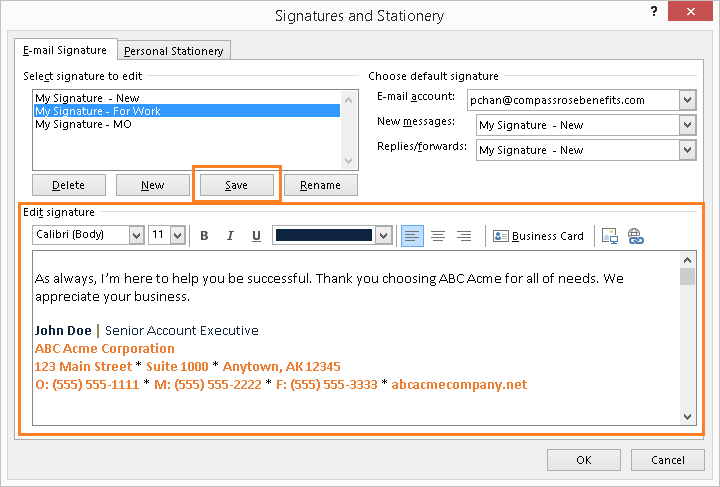
- In the Edit Signature panel, type in the text you want to appear as your signature,as illustrated below, then click Save.
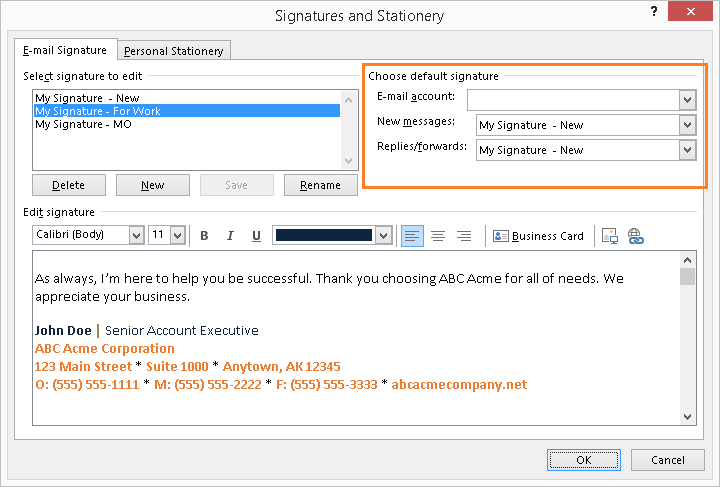
- Next, choose the email account (if you have more than one) for which you want Outlook to apply this signature to, as highlighted below.
- Next, define when Outlook is to automatically insert your signature, as highlighted below. There are two cases:
- For new messages - From the drop-down list, select the signature you just created and Outlook will automatically add it to any new messages you compose for the email account you selected.
- For replies and forwards - From the drop-down list, select the signature you just created and Outlook will automatically add it to any messages you reply to or forward for the email account you selected.
- Finally, click OK and close out all the dialog boxes that opened. Outlook is now configured to automatically inserted your signature based on the default settings you defined.
7. Junk Mail
Outlook maintains a Junk Email folder and automatically saves message that appears to be junk or spam into it. This feature reduces clutter in your Inbox and the potential exposure to emails containing malicious content. However, like many things, it is not 100% accurate in identifying all junk emails. Sometimes junk emails will be delivered into your Inbox and legitimate emails delivered to your Junk Email folder.
But, over time and with your help, Outlook can learn to more accurately identify spam versus legitimate emails. If you receive a junk email in your Inbox folder, perform the steps below to have Outlook will automatically move all future emails from this person to your Junk Email folder.
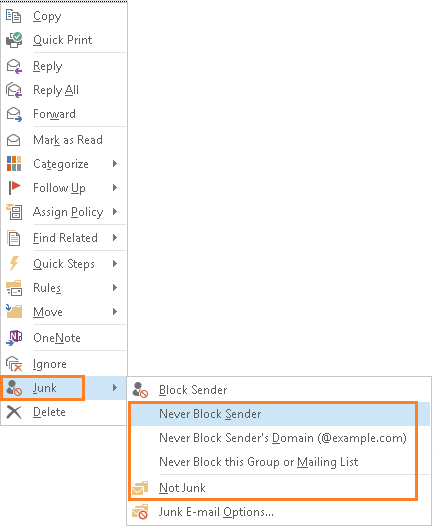
- Right-click on the message and click on Junk.
- From the list of options that appear, select Block Sender, as illustrated. The message will then be moved to your Junk Email folder, along with all future emails from the same email address.

At times, Outlook may incorrectly send a legitimate email to your Junk Email folder. To correct this and to train Outlook to recognize the email is legitimate, do the follow.
- Right-click on the message and click on Junk from the popup that appears.
- From the list of options, select Not Junk (or another option appropriate for you), as illustrated below. The message will then be moved to your Inbox folder. You will be given an option to tell Outlook whether to always trust this particular sender.
- Block Sender - Sends all future emails from this particular email address to your Junk Email folder
- Never Block Sender - All future emails from this particular email address will be delivered to your Inbox and not your Junk Email folder.
- Never Block Sender's Domain - All future emails from this particular company (domain) will be delivered to your Inbox and not to your Junk Email folder.
Note
Clicking Not Junk does not instruct Outlook to classify similar messages as non-junk. To help prevent legitimate messages from incorrectly moved to your junk folder, add your sender email address to your Outlook contacts or classify all messages from a sender's domain as not junk.
You can review your junk mail settings by right-clicking on a message and click on Junk > Junk Email Options.
In the Options tab of the Junk E-mail Options dialog box, you can select how aggressive Outlook reviews your messages to look for junk, as illustrated below.
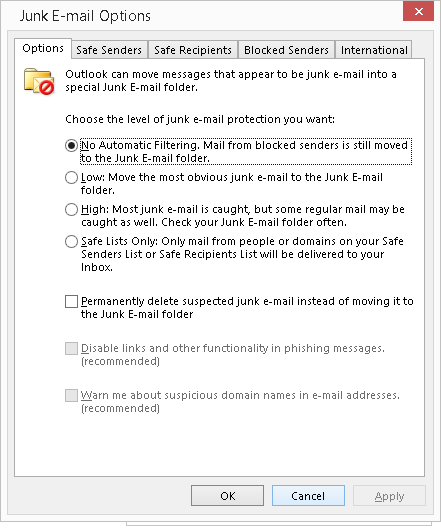
- No Automatic Filtering - Performs no review of your message. All emails, except from those in your blocked list, will be delivered to your Inbox folder.
- Low - Outlook will move the most obvious junk emails to your Junk Email folder.
- High - Outlook will make more aggressive efforts to move emails it identifies to be junk to your Junk Email folder. It is recommended that you regularly check your Junk Email folder to look for legitimate emails that may have been incorrectly identified as junk.
- Safe List Only - This is the most aggressive and will deliver messages to your Inbox folder only if the sender is in your Safe Recipients List. Otherwise, the message will be delivered to your Junk Email folder
In addition to the junk email protection setting, the other tabs in this dialog box allows you to maintain a list of safe and blocked senders.
- Safe Senders - Create a 'white-list' of email addresses and domains and Outlook will not treat emails from them as junk.
- Safe Recipients - Create a 'white-list' of email addresses and domains you normally send emails to and Outlook will not treat emails from them as junk.
- Blocked Senders - Create a 'blacklist' of email addresses and domains here and Outlook will automatically move any emails you receive from them to your junk folder.
- International - Use this tab to move emails to your junk folder based on the country it is from or the language the message is written in.
8. Insert Calendar
At times, you may need to share your information from your calendar with your email recipients. With Outlook, you can do this easily with the ability to adjust the level of details you want to share.
- In Outlook, open a new message window.
- In the toolbar, click on the Insert tab and click on the Calendar icon, as illustrated below.

- In the dialog box that appears (see screenshot example below), set the level of calendar details you wish to share with your recipients.
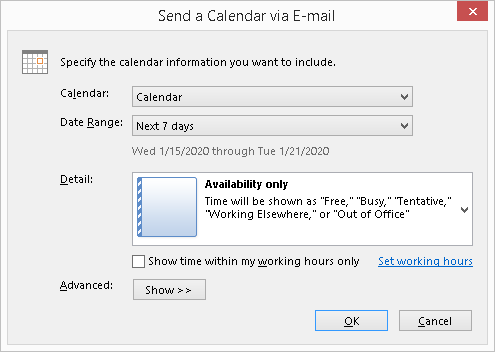
The options available here are as follows:
- Calendar - If you have multiple calendars in our Outlook, use this drop-down list to select the specific calendar that contains the information you want to share.
- Date Range - Use this drop-down list to set the number of calendar days you wish to share. The choices are:
- Today - Include calendar information for the current day.
- Tomorrow - Include calendar information for the following day.
- Next 7 days - Include calendar information for the next seven days.
- Next 30 days - Include calendar information for the next 30 days.
- Whole calendar - Include all your calendar information, including items from the past. However, Outlook limits the insertion of calendar information to 2800 items. If you have more than this, Outlook will display a warning message, as illustrated below. You will need to shorten your date range to limit the number of calendar items.

- Custom date range - Use this option to set a specific start and end date.
- Detail - Use this option to set the level of details you wish to share about your calendar events. The choices are:
- Availability only - Shows the times when you free or busy, but does not share the subject name or details of your calendar events.
- Limited details - Shows the times when you free or busy, along with the subject name of our calendar events, but not the details.
- Full details - Shows the times when you free or busy, the subject name and details of our calendar events.
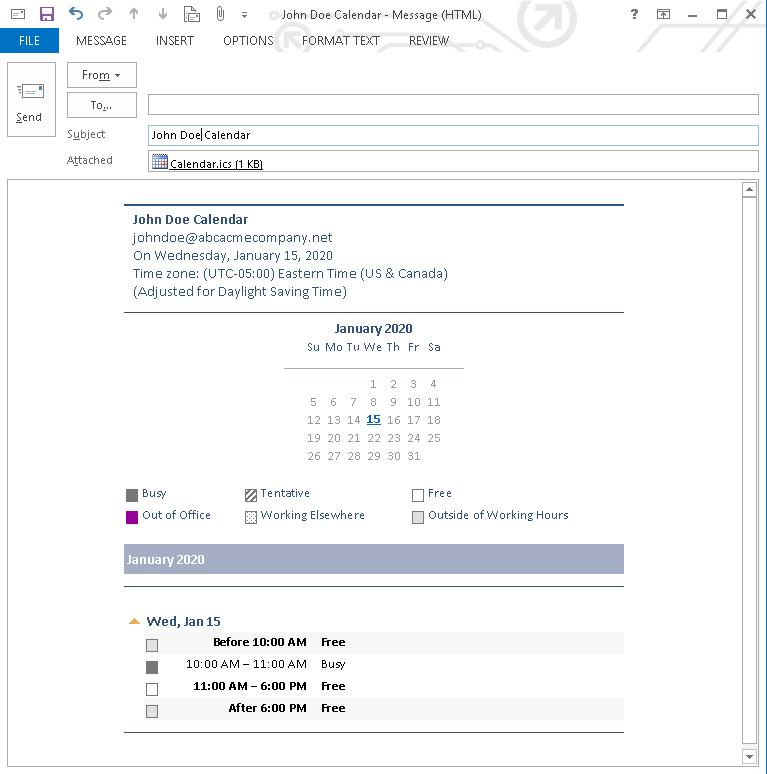
- Once you configured your sharing options, click OK and your calendar information will be inserted into the body of your message along with a ICS calendar file attached.
In the screenshot example below, the calendar being shared is limited to one day and contains availability information only.
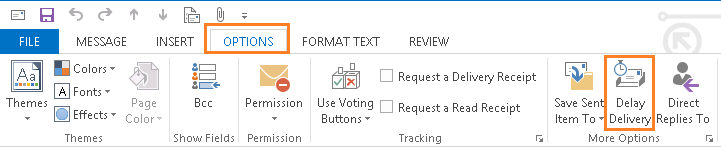
9. Delay Delivery
The delay delivery feature enables you compose an email message and set a specific time for Outlook to automatically send it. To set up delay delivery, follow these steps.
- Compose your message as you normally would, but do not click the Send button yet.
- From the top menu bar, click on Options tab, then click the Delay Delivery icon, as illustrated below.
- In the Properties dialog box, defined the date and time for when your message is to be sent.
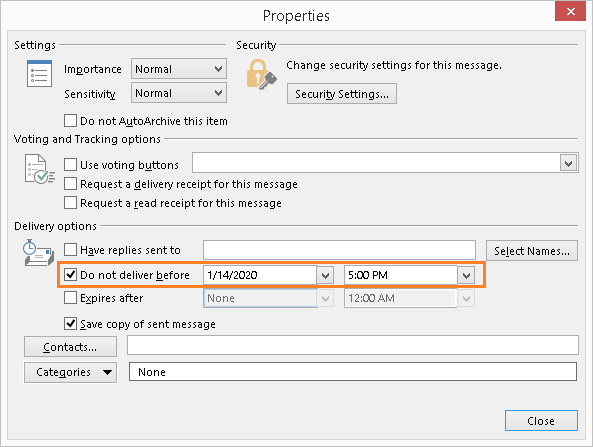
- Then click Close to exit the Properties dialog box and then click Send.
- Your message will now sit in your Outbox folder until the date and time you specified. Depending on how your Outlook and email server is set up, you may need to leave your computer on with your Outlook application up and running so that your delay message can be sent at the specified time.
Reminder
Depending on how your Outlook and email server is set up, you may need to leave your computer on with your Outlook application up and running so that your delayed message can be sent at the specified time. If you try to close Outlook before a delayed message has sent, you will be reminded that you have unsent emails in your Outbox.